Constructing a Flail
Materials Needed
- 1/2" PVC, Kitespar, or 3/8" Fiberglass rod for flails <=30" core
- Blue Camp Pad
- 4" long piece of Fun Noodle
- 5/8" Pipe Insulation
- 3/8" Pipe Insulation
- High density Open cell foam
- DAP Contact Cement
- 3M 77 Spray Glue
- Duct tape
- Black Cloth Tape
- Carpet tape (for rope wrapped handle)
- 1/8-3/8" rope
- Trigger
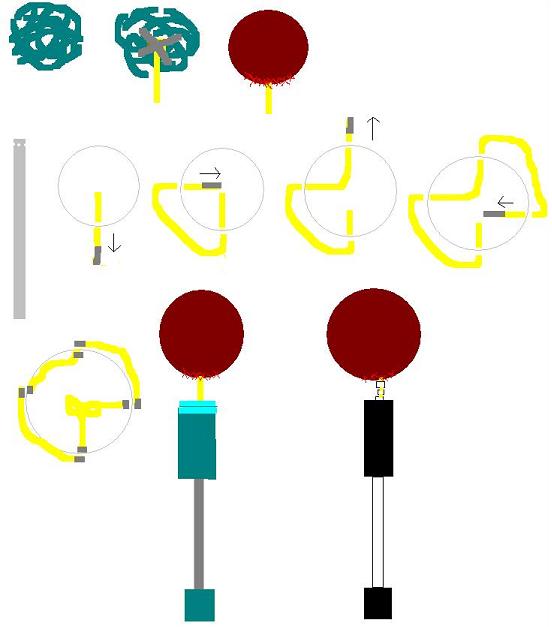
Constructing a Bag-head Flail
Originally taken from Eriador's construction site.
Be sure to use very durable fabric; if the fabric is at all prone to stretching, the chain/hinge will lengthen and likely fail for being over 6".
Constructing a Rope-head Flail
I (Tiberius Claudius Marcellus) created this flail 03/22/2010 after deconstructing my original bag head flail because I had too much material (thickness) in the chain and, overall, it was a cumbersome weapon. Please improve upon the design and make the appropriate changes.
Note: Mine is a DAPless method. My experiences have shown this tape combination to be equal to DAP in weapon longevity and superior in speed of creation and usability (no cure time).
Materials
- Power Drill
- 1/4" drill bit
- 2' section of 3/4" PVC
- 1 roll of Rhino Tape
- Black magic marker
- Cloth/hockey tape
- Duck tape
- A square of very durable cloth large enough to wrap around your flail head and sew shut. Stresses can cause the fabric to tear.
- Durable synthetic thread and sewing needle
- 12"-18" of thin (~ 1/4") rope/cord (natural or synthetic). DO NOT use twine or string. Extremely thin materials could break and/or still be considered an entrapment hazard by a weapons checker or herald.
- Blue Foam strips, odds and ends, chunks, etc (discarded sword blades work great)
- Blue Foam for incident padding and pommel.

Procedure
Head Construction
- Ball up your foam pieces into a loose, but cohesive flail head of proper dimensions. Blue foam will hit more solidly than open cell foam. If you must use tape, either use cloth tape or a very minimal amount of duck tape. If you have too much duck tape your flail head may hit too hard. Make sure that no odd pieces stick out to violate the 2.5" rule.
- Tie a knot at one of the very ends of your rope and securely tape it inside your flail head foam ball. Be careful not to put too much rope up inside the flail head because you might not have enough for your chain and to connect it to your core.
- Place the flail head on your cloth cover or in your pillow case and draw the sides up and around (removing excess material - you should be left with a "ball"), leaving a hole for the rope.
- Sew it appropriately together, making sure to pass the needle through your rope several times so you secure it to your cover, thus eliminating the chance for your chain to become illegally longer than the rules allow, should it detach from inside the flail head.
Attach Head to Core
- Drill 4 holes in a "cross" (+) pattern 1 inch from the head end of your core.
- Tightly wrap a small piece of duck tape to the free end of your rope and insert it into the center of your core. Thread it through one of the holes you drilled. The rope end should now be outside the core.
- Draw your rope through until 5.5" or 6" of chain is left. Take the taped end and push it through either of the holes to the side of the one you just came out of. Your taped end will now be inside the core.
- Thread the rope through and pull it tight, up and out of the core (use needle nose pliers if you have to). Make sure that your chain remains at the appropriate length. Adjust as necessary.
- Push the taped end of the rope back down in the core and out the next drilled hole, making sure to continue this "threading" in the direction you began. Pull it tight. Your taped end should now be outside of your core.
- Thread your taped rope end back through the last drilled hole so that it is inside the core and pull it back up through the center, making sure everything is tight. Double check to make sure your chain is still the legal length - loosen, adjust, and re-tighten as necessary.
- Use the magic marker to mark the rope where it goes through the drilled holes. Loosen the rope and put small pieces of duck tape over the areas that will be rubbing on the drilled holes in the PVC core. Re-tighten your rope and double check that your chain length has remained legal.
- Tie 1 or 2 knots in the very bottom of the chain where it meets the core, with the free duck taped end of your rope. This prevents the rope head from pulling the chain out of the core and either flying off or extending your chain to an illegal length. Cut off any remaining excess rope and push the knots into/center them over the core.
Core
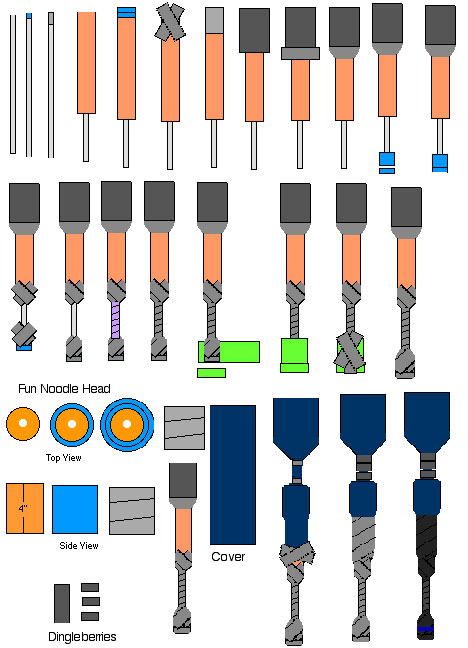
- Rhino Tape and spiral wrap blue foam to a depth of two layers over the top 8" of your core for incident padding.
- Cut out 1 or 2 circles of blue foam that have a diameter matching the incident-padded core. Cut a slit from one side in the disk(s) to the center of them. Slide the chain into the slit and tape them down on top of your incident padding. This will prevent injury from accidental stabs as well as reduce the measurable length of your chain in case you made it too long or didn't secure it well enough and it begins to "grow".
- Check your overall length. It must not exceed 40". If it does, now is the time to cut down the rear end of your core so that you are within length rules. When you achieve that, make a standard pommel out of blue foam for the rear end of the core.
Finishing Touches
- Wrap the entire length in cloth tape of your choice. (I use black on the pommel and incident padding, and white for the handle)
- Use remaining pieces of blue foam to create as many dingleberries as necessary. Rhino Tape them to the chain and cover them in cloth tape. Dingleberries must be large enough to prevent the chain from being an entrapment hazard. Each made from a single layer of blue foam should work, so long as the spacing between them is almost non-existant. The larger your spacing, the wider they will have to be. Remember: No more than 1.5" of chain may be left exposed.
Constructing a Loop-head Flail
Another flail design that is very new is the loop head flail. The loop head flail, although more difficult to make, is by far the strongest flail design.
Construction: (picts coming soon) *Experience helps a lot when building this*
Take a fun noodle, the length that you want your head, and DAP peices of foam over it. Take a sock and stretch it over the top, until tight. Take this head, and gripping by the end of the sock, proceed to bash it on something, like a workbench, until it is COMPLETELY stretched out. Now, mark your grip area as you would during the construction of a standard blue sword, and save the two inches for the pommel. Build up the core with enough foam, and wrap the handle. Take a loop of parachute cord, or some other thin 1/4" thick rope, as long as your total core, and loop the end of the sock through it. Now, hold the sock and pull the cord through your core. In the two inches of core reserved as pommel space, put a large carriage bolt in it and secure it with a cross of duct tape. Create a loop out of the end of the parachute cord coming through the pommel, and tie it over the bolt, securing it to the core. Tie the sock around the loop, with as much "chain" as you want, and cut off the excess. Finally, build a pommel. Congratulations, you have built a loop head flail!
This was designed by me, Daedryk, and for questions or comments, I can be reached at my email- swrdsparrer@yahoo.com
Relevant Construction Rules
1.4.5. Flails must conform to the following:
- 1.4.5.1. The striking surface must haves a minimum circumference of fifteen (15) inches measured on separate axes.
- 1.4.5.2. The maximum chain/hinge length is six (6) inches.
- 1.4.5.3. The maximum overall length is forty (40) inches.
- 1.4.5.4. The hinged part of the flail must be padded with foam to keep the chain from easily entangling a Weapon or body part. No more than 1 ½ inches of chain may be exposed.
- 1.4.5.5. Only one hinge per flail is allowed.
See Also
- Constructing a Blue Sword - the first construction project all new foamsmiths should undertake
- Constructing a Pommel

