Abacus Blue's Artificer Portfolio
This is going to be a living portfolio detailing for detailing the arts and sciences of Abacus Blue. Unless otherwise noted, all photos were taken by me and I retain all rights to said images.
Sewing
Misc Early Work
I learned to sew by taking quilting classes with my mom when I was quite young. Prior to belegarth I had a fair proficiency with a sewing machine, a relative understanding of hand sewing, years of modifying my own cloths, but no formal training in garment construction or patterning. Even sewing garments from a pattern was foreign, but I had audacity and a sewing machine and that was enough to push into the brave unknown. About 6 months into my first year of fighting I discovered the Belegarth Starter Kit and decided to attempt to make my own pants. The first version of Abacus's Overdesigned Pants was modified from the Large Salwar Pants Pattern in that kit. More details of that are on the Abacus's Overdesigned Pants page.
To go with the first version of my pants, I took apart my favorite green tunic to make a black copy of it. I had no experience with pattern making or even copying at that point. No one in my house even owned an iron so after taking the seams apart I simply layed each piece out on the my fabric on the floor and drew around them. I didn't account for seam allowance and didn't even try to do any truing of the pattern at this time. Because of this the skirt wasn't perfectly symmetrical and there were some smaller asymmetries in the top that were less noticeable. I purposely left the linen as raw edge to allow for fray and sewed a zig-zag a few inches in to control the fray. This tunic was the staple of my garb for several years. When I started fighting with a buckler the added pressure of the chest strap eventually ripped a hole in the side that I couldn't repair. I removed the top, added a waistband, and that skirt remains part of my garb to this day.
Around that same time Nea wanted a wrap top with a hood. I started with an old bralette of theirs that fit well and again, took it apart and traced it directly on the fabric. The hood was traced from a hoodie of mine. Two extra flaps were added in place of a back band so that the top could tie in the back. Again, this has asymmetries and general lack of cleanness originating from the way the pattern was made.
Near the end of 2019 I made a patchwork surcoat for another friend. The shape and patterning was copied from another surcoat of his. Starting with just white canvas I cut each piece out and separated them into sets of how blue each piece needed to be. I then dyed the sections starting by dying everything and then each section that was supposed to be more blue got another pass of more blue. When all the dying was done the pieces were sewn into strips from the darkest blue up to the white. Those strips were offset slightly and then sewn together into a large fabric piece. From there the pattern pieces of the surcoat were cut using another surcoat as a base. Everything was fitted together and the edges were bound in bias.
All of this work was still rudimentary, but it built the base I needed to start making things that were both more complicated and more unique.
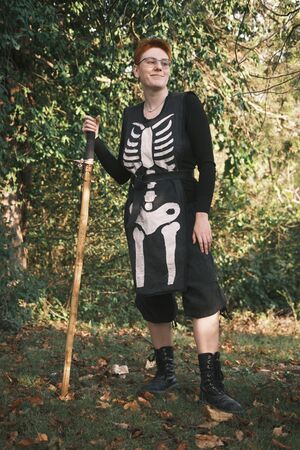
Nea's Skeleton Tabard
~ October 2021 ~
This was my first foray into applique or truly custom work as a whole. Nea is a skeleton and as such I wanted to make them something to represent that. They are also a herald and so I wanted to make sure that this was reversible with yellow as the base for the reverse side. The outside of the skeleton tabard is black with white bones, and the reverse side is yellow with black bones. The fabrics are all quilting cotton with tiny floral texture. I wanted something that fit with Nea's personality and the combination of spooky and floral fit them well. The base of the tabard was cut out and then basted together. I then pinned the fabric for what would be the skeleton to their respective sides, hand drew the shapes of the skeleton using my own body for placement and spacing, and then stitched around each shape using a simple straight stitch. When the skeleton was sewn, I cut out around all of the pieces on both sides leaving the skeleton behind. I left the edges raw on purpose so that over time it would provide a nice, monstery, look. After both the front and back were done I attached them, and then used bias tape to finish the edges. While this has a number of mistakes and things I would do differently now, it was a huge learning experience and the first time I feel like I made something truly unique.

Abacus's Overdesigned Pants
~ V2 fall 2022 ~
I am currently on V2 of these pants.
These pants are designed not just to look good in belegarth aesthetic, but also functionally hold up to the strain of fighting day in and out. Starting with a capri version of Large Salwar Pants Pattern the sizing is modified to be similarly baggy on each person. Version 2 of these pants features a separate waistband that the laces in the front. The pants are pleated front and back along the waistband to lay smoothly over hips. There is a small dart in the center back to shape the rear better. There are large pockets sewn into the side seams and also attached at the waistband to distribute strain. There are patches sewn into the knees and there are small pleats above and below the knees on the front of both legs to prevent excess strain on the leg/waist of pants while legged in battle. The bottom of the legs are closed with ties where the pants are again, pleated into the ties. There is also a small slit on the outside seams to make sure there is enough room to pull the pants up over your knees when untied allowing for kneepads to be put on or removed without fully taking these pants off.

Cicada Season Wrap Tabard
~ June 2023 ~
This was inspired by the 50s walk-away wrap dress and modified to be more belegarth appropriate. The front panel is drafted as a standard tabard would be. The back is drafted to wrap slightly around the sides on the top for more coverage where it connects to the waistband. The waistband laces in the front through sewn eyelets. The silhouette of the original dress calls for a full circle skirts, but for this I chose to make a 4 piece gored skirt that tapers into the waist and flows out behind.
The back features an appliqued symbol of The Lost, my unit while the cicadas on the front are meant to look like a fade from afar. The cicadas are also representative of my lore as a Hobben. Typically Hobs wear a chain to keep their kusts, the bugs that make them up, safely inside their body. This garment was meant to be worn on days where my bugs are set free to hunt. They are bunched together at the tip of the tabard and spread out moving up as they 'emerge'. The cicadas themselves are stamped with a screen-printing ink using a stamp I hand carved myself from a design I drew. They were then layered and appliqued on with care to cover ever edge with a nice satin stitch.
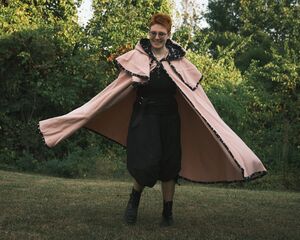
Nea's Caped Cloak
~ July 2023 ~
While perusing a weird local fabric store we came across some heavy wool in Nea's shade of pink and decided it would be perfect for a warm winter cloak. Because we got a good deal on the wool we had enough to make a full length cloak easily. The main body of the cloak is a half circle to strike the balance between dramatically flowy and reasonably weighted. It also features a full circle cape for added drama. The hood was taken from a pattern, and lined with (glow in the dark dancing skeleton) flannel. The seams where the cape, cloak, and hood meet are hidden between the cape and the main body of the cloak. The edge of the cloak is bound in bias that I custom cut from the same flannel that the hood is lined in. There are small leather patches on the inside for the cloak for the clasp to be sewn to to make sure it doesn't strain the wool too much and rip is over time. When closed, the cloak also overlaps an inch on the front for added warmth. The overlap, as well as the direction of the clasp in inverted from the usual configuration because Nea is left handed.

Nea's Squire Hood
~ June 2024 ~
This skjoldstyle hood was made to be worn to signify Nea's squireship to Syr Talon. The front and back panels are made in the traditional white of a squire while the hood and shoulders are made in maroon, one of Talon's knighting colors. Because Nea specializes in heralding, it was extra important that this be reversible with yellow. The outside of the tail has stripes of silver as that is Talon's other knighting color, and the inside has blue to represent the blue and yellow of Dur-Demarion, Nea's realm. The bias binding was hand made to be silver on the outside and blue on the inside. The symbol itself was made using iron on HTC cut with a cricut.
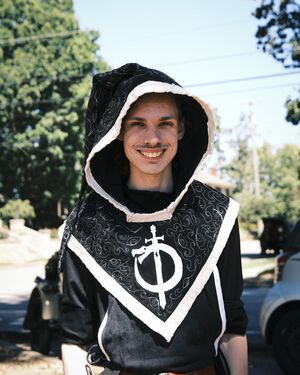
Ghostly Hood
~ September 2024 ~
Frederick requested a 'ghostly hood' in black and white to match unit colors, and with his unit's symbol represented on it. The choice of swirls and eyes were taken from ongoing motifs in Frederick's characterization as a ghost. The hood is patterned as a skjold style hood with an added monster tail, and is fitted to Frederick directly. The Lost , Frederick's unit, symbol is appliqued on the front with some minor modification (shortening the tail slightly, as well as enlarging the sword details) to allow for the small scale of the applique. The line art embellishment was made using free motion machine stitching, a quilting technique. The outer shell was sewn together before the stitching to make sure that the lines connected across panels. After the embellishment was complete the lining was put together and white linen bias I made for this was sewn on in the method of quilt binding.
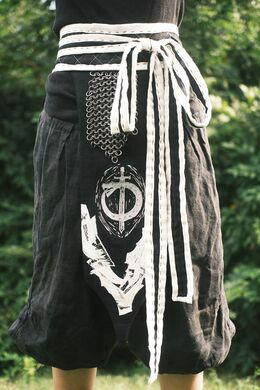
Blue's Lost Shtulk-Khep
~ October 2024 ~
The Shtulk-Khep is the metal or leather covering worn by Hobben to keep their kusts in their bodies. Often made to hang from a belt, this one was made attached to an obi belt. The obi belt was drafted to my measurements directly and quilted for added stability. The edges of the belt were finished with big stitch binding for a more monstery look while maintaining the stability of a proper binding technique. The chevron on the bottom was made from scrap cuttings from the edges of the stamped cicadas I made for the Cicada Season Wrap Tabard and sewn on using a zig-zag stitch to allow for a scrappy but finished wear over time. The Lost symbol above the chevron was made from a linocut stamp I hand-carved myself. The chain itself was cut out of a friend's armor and hand stitched on.
Foam Smithing
Blue's Perfect 55
Moth's Quarterstaff
Misc

Nea's Plastidip Shield
This shield was first attempt (and one of my only) at plastidip art. The symbol is Nea's heraldry. The outer edge of the the shield is blue foam and is slightly raised past the front face. The wood is made from sheets of craft foam, and I used a wood-burner to create the textured lines prior to the platidip layer. The symbol itself is three layers of craft foam, which I cut out by hand, to raise it above the background. Once all the foam was in place I covered it in plastidip and then painted it with acrylic paints. It was finished with a clear sealant after the acrylic layers had all dried.
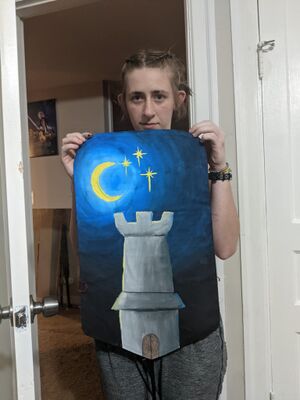
Syr Talon's Small Dur Demarion Shield
Dur-Demarion, or the Twilight Citadel, is Syr Talon's home realm. Over the years it has gone through several iterations of it's symbol and this shield is based on the version that features a single tower with the signature crescent moon and trio of stars above it. This is painted using acrylic paints from a sketch that was drawn directly on the shield. It was heat seals to hold up to weather.
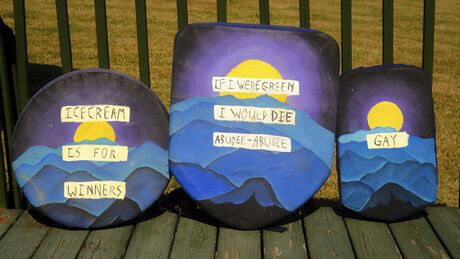
Blue's Family of Mountain Shields
My shields are all hand painted with the same depiction of the sun either rising or setting over the blue ridge mountains. On top of the scenery on each shield a different phrase is painted. Each phrase represents a smaller part of their own larger stories. They are painted in acrylic and then heat sealed for longevity.
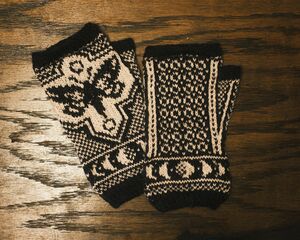
Colorwork Moth Mitts
While I've been knitting my whole life, I'd avoided color-work up until now. Using the Underwing Mitts pattern from Erica Heusser I made these with a super-wash merino and alpaca mix. I didn't bother with the accent color and instead did white where the orange in the pattern was. The strands are caught every other stitch to make for a smooth and stretchy weave.
